Creating Advanced Art Layers

Advanced art layers can be used to give a character multiple/colorable outfits. Note: This tutorial was written for photoshop. You can use gimp, but you'll have to either rewrite my script, or add the art in game manually.
Creating the Art
The first thing you'll want to do is to create the actual art. If you're creating AI art, you'll want to draw some clothes over the character and only generate the parts you've drawn. Otherwise you may end up with clashing layers. If you know how to draw yourself, it's going to be significantly easier, since you can just draw the clothes on separate layers directly.
Since I can't draw, this tutorial will be from the perspective of using AI tools.
You can add as many or as few layers as you want, but these are the layers that are used by default and the photoshop script is setup to auto handle these layers:
| Description | Base Layer | UB Layer | File name for PS script |
|---|---|---|---|
| Gloves | 50 or 18 | N/A | gloves.png |
| Boots | 40 | N/A | boots.png |
| Sling Bikini Heavy Armor | 25 | N/A | sling_heavy.png |
| Sling Bikini Medium Armor | 25 | N/A | sling_med.png |
| Sling Bikini Light Armor | 25 | N/A | sling_light.png |
| Bodysuit medium armor | 25 | N/A | bodysuit_med.png |
| Bodysuit light armor | 25 | N/A | bodysuit_light.png |
| Heavy 2-part armor | 25 | 35 | heavy.png |
| Medium 2-part armor | 25 | 35 | med.png |
| Light 2-part armor | 25 | 35 | light.png |
| Collar | 23, 3 or 43 | N/A | collar.png |
| Nipple studs (optional) | 22 | N/A | nipple_studs.png |
| Aroused heavy state | 15 | N/A | aroused_heavy.png |
| Pain heavy state | 15 | N/A | pain_heavy.png |
| Aroused state | 10 | N/A | aroused.png |
| Pain state | 10 | N/A | pain.png |
| Orgasm state | 5 | N/A |
Preparing the File
We'll need to create a photoshop file. In this tutorial I'll be creating a jaguar character. I'll drag the naked layer into photoshop and save it as a new file called "jaguar.psd"
The layer order, names, and settings will be used by the exporter to generate a file you can use in the FetishQuest devtools to make it easier to setup your character art. We'll start with the lower nr layers and go up.
FQ supports the following layers (tho see public/classes/PlayerIconState.js in the source for something more up to date:
- FaceResting : 5 - Resting face reaction. I use it for orgasm faces.
- FaceMild : 10 - Facial expression for mild reactions. I use it for pain/arousal.
- FaceHeavy : 15 - Facial expression for heavy reactions, I use it for heavy pain/arousal such as critical hits.
- CosmeticLower : 20 - Allows you to put cosmetics under armor. Nipple clamps and collars are good examples. I won't be using this in the tutorial.
- ArmorLower : 25 - Lower body armor
- Handheld : 30 - Handheld items. Not used in this tutorial because there's way too many items.
- ArmorUpper : 35 - Upper body armor.
- ArmorCosmeticJewellery : 40 - Jewelry layer. Not used in this tutorial.
- ArmorCosmeticLower : 45 - Lower body cosmetic. Not used in this tutorial.
- ArmorCosmeticUpper : 50 - Upper body cosmetic. Not used in this tutorial.
- Stains : 55 - Stain/slime layers etc. Not used in this tutorial.
When the image is drawn, layers are drawn from lowest to highest, drawing active higher value layers on top of lower value layers. Only one image per layer is ever drawn. The higher the layer is in the FQ editor/photoshop file, the higher priority it gains. There's an exception for temporary layers, such as FaceMild and FaceHeavy, which are triggered from events and the last triggered one gets priority.
Preparing the Orgasm Face


Note: In all these examples, if you draw your own art you can skip the erasing parts of these steps, and go directly to naming your layers. Just keep in mind that you can only have one photoshop layer per art layer. So if for instance your orgasm face is drawn on multiple layers, you'll have to merge those. But don't merge them to the background!
- Copy your orgasm face art over the background in the jaguar.psd file and rename the layer to 5_orgasm. The number followed by _ is required and tells the script what FQ art layer you want the photoshop layer to go on. Layer 5 is the FaceResting layer, which we'll use for orgasm. To make things easier, I'll create a Faces folder and put it in there. But you don't have to.
- If you want to prevent a layer from being exported, start the name with # and it will be invisible in the exporter script.
- Next we'll need to erase everything but the face (changed pixels). The easiest way I've found to do this is to change the blend mode of 5_orgasm to "difference". This makes pixels that are the same as the background pure black. While in this mode, use the magic wand with a tolerance of 1 and Sample All Layers checked on any of the black parts of the picture. Then delete the black pixels. Set the blend mode back to normal.
- You may want to do some touch-ups with the eraser tool.
Preparing the Reaction Faces
Reactions are layers that should show up for a specified amount of time. They're all bound to text events, meaning you probably want to use the meta tags conditions. Reaction layers are also special in that you can bind multiple ones to the same layer, and only the most recently triggered one will be made visible. This makes them good for facial reactions.
When using photoshop, you can use the fqAutoLayers script to automate removing the unchanged pixels.
- Copy your aroused face art into the photoshop file.
- Name the layer 10_aroused to use layer 10 (FaceMild). And put it in the Faces folder, on top of 5_orgasm.
- Do the same difference trick. Remember to hide any layers except 10_aroused and the background.
- If you plan to add a collar, you probably want to use a soft eraser brush to remove everything below the chin.
- Do the same with the pain expression, but name it 10_pain
- Do the same thing with your heavy aroused/pained layers, but use layer 15 by naming them 15_aroused_heavy and 15_pain_heavy
- If you did it right, you should now have your layers setup as such:
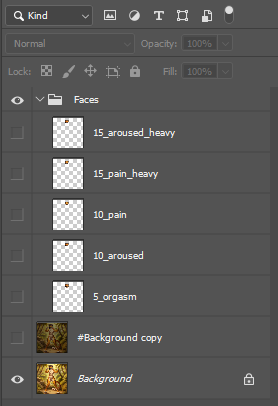
Example of facial reaction layers in photoshop. Ignore the #Background copy layer. I'm only using it to help erase needless pixels.

Preparing Clothing Layers


Remember that the order of photoshop layers matter. Each layer number (this is the number the layer name starts with) is unique in FQ, and only the first valid layer nr matching a set of conditions will be drawn. Basically, put the most unique outfits on top, and use the lower ones as a fallback.
- The first outfit we'll prepare is the fallback outfit: An outfit that you can fall back on if none of the layers above it are valid. You can pick what you want, but for this I'm going to pick the cloth outfit (shirt and panties).
- Create a new group and name it something descriptive such as "cloth"
- Paste the cloth art into the file and put it in said group.
- Use the difference trick again to remove unchanged pixels. I also recommend using a soft eraser to make the visible parts as small as possible.
- Next select only the top part of the outfit, using a selection tool of your choosing.
- Hit ctrl+shift+J to split it into a new layer.
- Name the layer containing the top half of the armor something like 35_cloth_ub and the lower half layer 25_cloth_lb
- If you did it correct, you should have something like this:
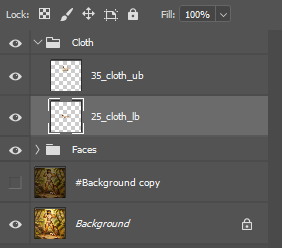
Ignore the #Background copy layer. - To allow players to recolor the layer, we'll need to create a mask layer. Start by selecting the 25_cloth_lb layer.
- This is the time consuming part. Use a selection tool of your choosing and select only parts of the panties you want to recolor.
- Hit ctrl+j to copy it to a new layer. Name it 26_cloth_lb
- Hit ctrl+u to enter hue/saturation. Drag the lightness all the way up to make it pure white, and accept.
- Hit ctrl+u again and check colorize. Drag saturation all the way to max and color to -50.
- In the layer browser, change the blending mode to multiply or overlay, depending on what you think looks better.
- Alter the opacity until it looks good. Keep in mind this is what it's going to look like if the player dyes their armor pure red.
- Set your brush to pure red and use a small brush / eraser to patch up any sections you missed.
- You can use hue/saturation on this layer to preview what it's going to look like in different brightness and colors.
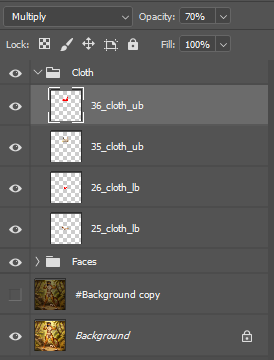
- Repeat for the top part of the outfit.
- Your layers should now look like this:
- Adding a bodysuit is basically the same, except you'll only be using layer 25 and layer 26, since it only affects one layer.
- From this point on it's just rinse and repeat for your art layers. But remember the order of your photoshop layers matter. The following is how I ended up laying it out. I went with the strategy of "most specific outfit" first, meaning bodysuits on top:
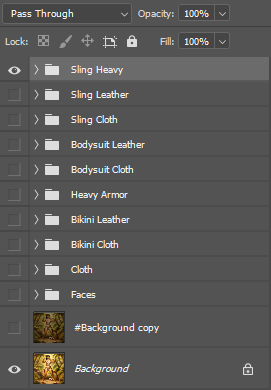
Advanced armor setup with faces and armor types.


Using the script

Time to bake the different layers! If you wanna do this by hand, you'd crop, make a note of the top left corner, and manually add the layers in the FQ layer editor. But if you have photoshop you can run a script to bake all the layers into a folder and generate a JSON file you can use for uploading. You can grab the script here: FQCrop Batch
If everything goes according to plan, you'll see a bunch of images pop up as it crops them for you. A new folder with the same name as the PSD file will be put in the PSD directory. This includes all the sliced images. The background image will also be saved in said folder as a PNG with _n appended to it. This is the nude layer.
The script also outputs (in the same folder as the PSD file) a JSON document named the same as the PSD file. This is pre-filled with some basic values. But we'll need to add conditions to it.
Note: If you make changes in the photoshop file and re-run the script, it'll load and update the JSON file, maintaining your conditions. But if you change the name (including the number) of a photoshop layer, you'll have to modify it in the JSON file to match first. This is because the script will NEVER DELETE anything from the JSON file, only update and add. So make sure you have the order of photoshop layers correct before you start adding conditions to the JSON file.
Also note: The coordinates in the JSON file are based off of the largest image in the set, which is usually the background.
Modifying the JSON file
My preferred way to map conditions is to modify the JSON file. But you can also skip editing the JSON file and import it into the FQ mod tool. Then use the mod tool to setup the conditions. If you do, I recommend you export it back to JSON in case you want to rerun the script to update images and positions. The JSON file just contains an array objects for each layer. Each object may look something like:
{
    "icon": "25_sling_heavy.png",
    "conditions": [

    ],
    "layer": 25,
    "duration": 0,
    "x": 363,
    "y": 133,
    "slot": "",
    "blendMode": "source-over",
    "opacity": 1
}
- Icon is the image file name.
- Conditions is an array of FQ conditions that must be matched (see below). If you follow the naming convention in the jaguar demo file, it will try to auto fill conditions.
- Layer is the FQ art layer.
- Duration is used in reaction faces, and specifies how long it should show in milliseconds.
- X/Y are pixel coordinates relative to the largest image (should be the background).
- Slot is the armor slot for the mask layer. It specifies what armor slot it should grab the color from.
- Blend mode is the blend mode. source-over is the same as normal in photoshop.
- Opacity is the opacity between 0-1
On top of the file is a URL field, you can set that to the base path where you're hosting your files.
The script will setup most of these for you, except the conditions, which we'll have to add manually.
- Open the JSON file in one window and the FQ mod tools in another. Load up your mod and go to the conditions listing.
- Search for conditions here and add them to the condition arrays. Example for heavy sling bikini with sling bikini and lowerBodyHard (hard armor) conditions. Note that layer 26 is the masking layer for layer 25. Both of them need the same conditions to work.
    {
        "icon": "26_sling_heavy.png",
        "conditions": [
            "targetWearsSlingBikini", "targetLowerBodyHard"
        ],
        "layer": 26,
        "duration": 0,
        "x": 383,
        "y": 159,
        "slot": "lowerBody",
        "blendMode": "multiply",
        "opacity": 0.70196078431373
    },
    {
        "icon": "25_sling_heavy.png",
        "conditions": [
            "targetWearsSlingBikini", "targetLowerBodyHard"
        ],
        "layer": 25,
        "duration": 0,
        "x": 363,
        "y": 133,
        "slot": "",
        "blendMode": "source-over",
        "opacity": 1
    },
| Outfit | Upper Body (If any) | Lower Body | Notes |
|---|---|---|---|
| Sling Heavy | "targetWearsSlingBikini", "targetLowerBodyHard" | Sling bikinis are also tagged as bodysuits. So they need to go above bodysuits. You can think of the bodysuit tag as any one-piece. | |
| Sling Leather | "targetWearsSlingBikini", "targetLowerBodyLeather" | ||
| Sling Cloth | "targetWearsSlingBikini" | Since the other two sling bikinis are above, they will get priority. So we use this as a catchall for sling that don't match above conditions. | |
| Bodysuit Leather | "targetBodysuit", "targetLowerBodyLeather" | ||
| Bodysuit Cloth | "targetBodysuit" | Same thing with this, if the body suit isn't leather and we're wearing a bodysuit. We fall back to this one. | |
| Heavy Armor | "targetUpperBodyHard", "targetNoBodysuit" | "targetLowerBodyHard" | This is the last heavy armor, so we use this as a fallback for hard. Bodysuits only use the bottom layer, so we need to add the targetNoBodysuit condition to prevent upper body from overriding bodysuits. |
| Bikini Leather | "targetUpperBodyBikini", "targetUpperBodyLeather", "targetNoBodysuit" | "targetWearsThong", "targetLowerBodyLeather" | |
| Bikini Cloth | "targetUpperBodyBikini", "targetNoBodysuit" | "targetWearsThong" | Last bikini check, so we fallback for all materials other than leather. Last thong also. |
| Cloth | "targetWearsUpperBody", "targetNoBodysuit" | "targetWearsLowerBody" | Last call for clothes. Only check if they're wearing anything on the relevant slots (and upper body isn't bodysuit since we have a fallback for that above). This is used as the final fallback if nothing above matches. |
| Orgasm | "targetHasOrgasm" | Technically not clothes. But it's a passive art layer just like the clothing. It will be visible when the player has the orgasm wrapper. |
Finally we need to add conditions to the facial expressions. These are ACTIVE art layers and conditions are checked against texts whenever the player is a target of one. You can use sender/target conditions where sender is who caused the text and target is ALWAYS the player the art is attached to. This is pretty straight forward since you can use the existing meta tag conditions
| Layer | Conditions |
|---|---|
| aroused_heavy | "metaVeryArousing" |
| pain_heavy | "metaVeryPainful" |
| aroused | "metaArousing" |
| pain | "metaPainful" |
You can find the full JSON file I used for the jaguar here.
You should now have a JSON file all setup and ready to go! Let's import it into the FQ editor!
Importing into the FQ editor


- First off, create a player in the editor. Click the question mark on the player window for help with filling out the fields. But if you're using advanced art layers, you can skip filling out the art fields for now.
- Next you need to upload the sliced images you generated. If you have your own webserver, you can just upload them there and make a note of the path. If you upload them to an image service they'll probably get renamed. In that case you'll need to edit each of the created layers in the FQ mod tools. This is a bit tedious, but needs to be done. Note: You don't need to specify the full URL anymore! Say I upload 5_orgasm to "https://i.ibb.co/fx8FNvG/5-orgasm.png". I then put https://i.ibb.co/ into the "image base path" in the player editor. ALL image URLs used in the player should no longer the first part of the URL. So if I have said base path, then the icon file would just be "fx8FNvG/5-orgasm.png" instead of the full URL.
- Put the file name of the _n file in the image_nude field. In my case "jaguar_n.png". Unless you follow the note above, you'll have to paste the full URL.
- Click the import JSON button and select the JSON file you generated. It then auto populates the layers. If you uploaded the files to an image service, you can click the layer items and edit the URLs. You can also export your JSON file from here, should you break something while testing. Note: If you're re-importing the JSON file you can check "Replace ALL" and it will delete all the existing layers before adding from the JSON file.
- If you're not happy with the order of the layers, you can reorder them from the player editor.
- Finally go to the Gallery listing and create a new entry.
- You can change the tags here to select what outfit the character should be wearing in the new game listing.
Modifying
- Large changes such as modifying the layer order or layer names in photoshop will require you to delete the JSON file and restart from the exporting step.
- Minor changes such as erasing or recoloring a layer without renaming it can be handled by simply exporting it again. But note that you will have to rename the files again in the editor if you used a service that renamed your uploaded files, which may be tedious.
- When you start playing, the art layers are snapshotted and won't update automatically when you refresh the game. But there's a function to copy your layers from a library player. If your player is the first player in the game (as is usual when you start a new game), you can open the console (chrome: ctrl+shift+j) and run: game.players[0].replaceIconsByPlayer('pc_jaguar') - It'll copy the art layers from a player by label. This is especially handy when changing things around in the player editor.