Creating Advanced Art Layers

Advanced art layers can be used to give a character multiple/colorable outfits. Note: This tutorial was written for photoshop. You can use gimp, but you'll have to either rewrite my script, or add the art in game manually.
Creating the Art
The first thing you'll want to do is to create the actual art. If you're creating AI art, you'll want to draw some clothes over the character and only generate the parts you've drawn. Otherwise you may end up with clashing layers. If you know how to draw yourself, it's going to be significantly easier, since you can just draw the clothes on separate layers directly.
Since I can't draw, this tutorial will be from the perspective of using AI tools.
You can add as many or as few layers as you want, but for this tutorial I'll be creating the following layers:
- A naked base layer.
- Three versions of a sling bikini: Plate, Leather, Cloth.
- Two versions of a bikini: Leather, Cloth.
- A breast/crotch plate combo
- Two bodysuits: Leather, Cloth.
- A shirt/panties combo
Preparing the File
We'll need to create a photoshop file. In this tutorial I'll be creating a jaguar character. I'll drag the naked layer into photoshop and save it as a new file called "jaguar.psd"
The layer order, names, and settings will be used by the exporter to generate a file you can use in the FetishQuest devtools to make it easier to setup your character art. We'll start with the lower nr layers and go up.
FQ supports the following layers (tho see public/classes/PlayerIconState.js in the source for something more up to date:
- FaceResting : 5 - Resting face reaction. I use it for orgasm faces.
- FaceMild : 10 - Facial expression for mild reactions. I use it for pain/arousal.
- FaceHeavy : 15 - Facial expression for heavy reactions, I use it for heavy pain/arousal such as critical hits.
- CosmeticLower : 20 - Allows you to put cosmetics under armor. Nipple clamps and collars are good examples. I won't be using this in the tutorial.
- ArmorLower : 25 - Lower body armor
- Handheld : 30 - Handheld items. Not used in this tutorial because there's way too many items.
- ArmorUpper : 35 - Upper body armor.
- ArmorCosmeticJewellery : 40 - Jewelry layer. Not used in this tutorial.
- ArmorCosmeticLower : 45 - Lower body cosmetic. Not used in this tutorial.
- ArmorCosmeticUpper : 50 - Upper body cosmetic. Not used in this tutorial.
- Stains : 55 - Stain/slime layers etc. Not used in this tutorial.
When the image is drawn, layers are drawn from lowest to highest, drawing active higher value layers on top of lower value layers. Only one image per layer is ever drawn. The higher the layer is in the FQ editor/photoshop file, the higher priority it gains. There's an exception for temporary layers, such as FaceMild and FaceHeavy, which are triggered from events and the last triggered one gets priority.
Preparing the Orgasm Face


Note: In all these examples, if you draw your own art you can skip the erasing parts of these steps, and go directly to naming your layers. Just keep in mind that you can only have one photoshop layer per art layer. So if for instance your orgasm face is drawn on multiple layers, you'll have to merge those. But don't merge them to the background!
- Copy your orgasm face art over the background in the jaguar.psd file and rename the layer to 5_orgasm. The number followed by _ is required and tells the script what FQ art layer you want the photoshop layer to go on. Layer 5 is the FaceResting layer, which we'll use for orgasm. To make things easier, I'll create a Faces folder and put it in there. But you don't have to.
- If you want to prevent a layer from being exported, start the name with # and it will be invisible in the exporter script.
- Next we'll need to erase everything but the face (changed pixels). The easiest way I've found to do this is to change the blend mode of 5_orgasm to "difference". This makes pixels that are the same as the background pure black. While in this mode, use the magic wand with a tolerance of 1 and Sample All Layers checked on any of the black parts of the picture. Then delete the black pixels. Set the blend mode back to normal.
- You may want to do some touch-ups with the eraser tool.
Preparing the Reaction Faces
Reactions are layers that should show up for a specified amount of time. They're all bound to text events, meaning you probably want to use the meta tags conditions. Reaction layers are also special in that you can bind multiple ones to the same layer, and only the most recently triggered one will be made visible. This makes them good for facial reactions.
- Copy your aroused face art into the photoshop file.
- Name the layer 10_aroused to use layer 10 (FaceMild). And put it in the Faces folder, on top of 5_orgasm.
- Do the same difference trick. Remember to hide any layers except 10_aroused and the background.
- If you plan to add a collar, you probably want to use a soft eraser brush to remove everything below the chin.
- Do the same with the pain expression, but name it 10_pain
- Do the same thing with your heavy aroused/pained layers, but use layer 15 by naming them 15_aroused_heavy and 15_pain_heavy
- If you did it right, you should now have your layers setup as such:
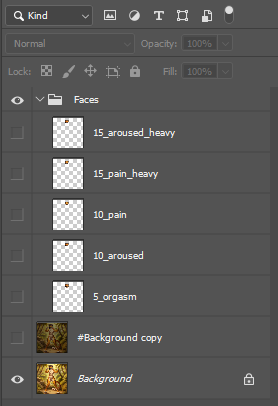
Example of facial reaction layers in photoshop. Ignore the #Background copy layer. I'm only using it to help erase needless pixels.
